Hey everyone! I’m excited to share the progress on a passion project of mine: BenshiDash. The goal is to create a sleek, car-dashboard-style interface for Benshi-compatible ham radios (like the GMRS-PRO). Think of it as a head unit display, but for your radio! 🚀
Let’s dive into the UI and see what’s actually wired up and working so far.
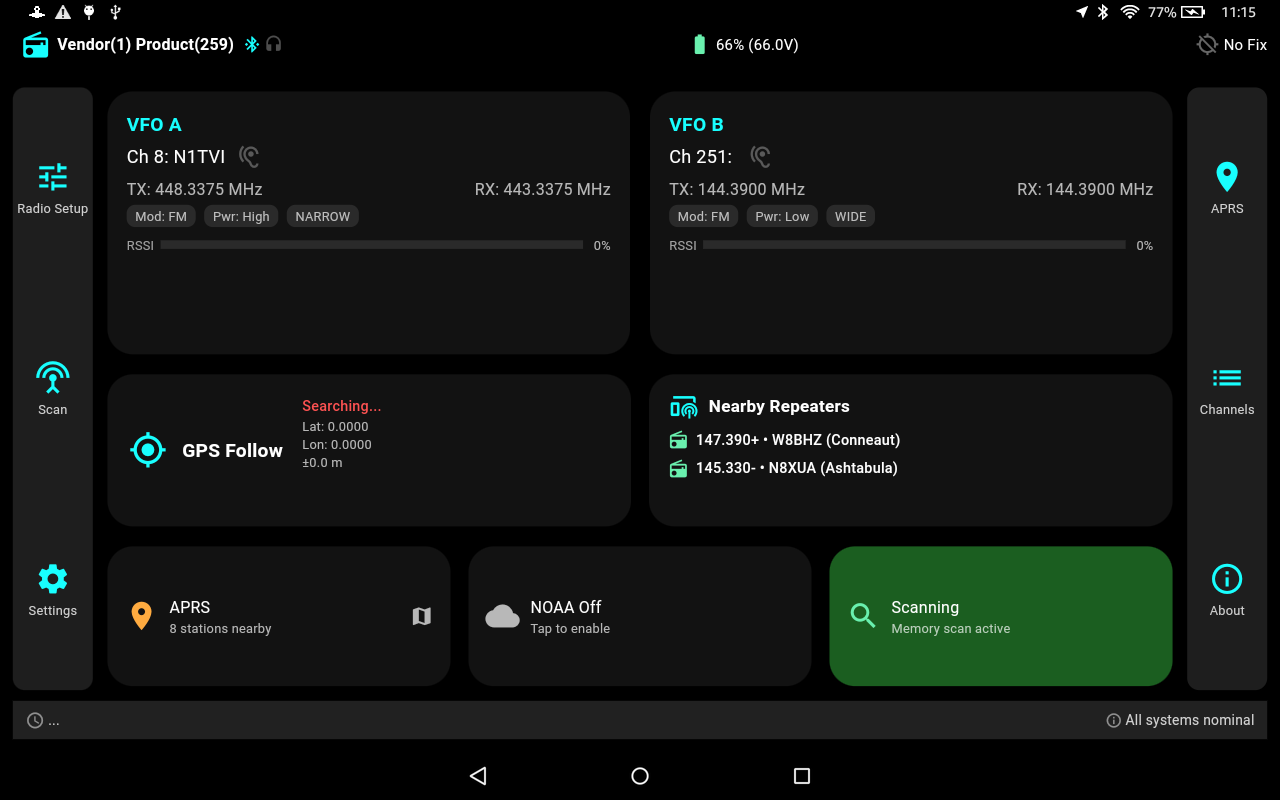
🏠 The Dashboard: Your Command Center
The main screen is the Dashboard, and it’s where the most critical information lives. The core of this screen is fully functional and pulls real-time data directly from the radio.
- Dual VFO Panels: You get two main panels, one for VFO A and one for VFO B. These aren’t just static displays! They show you:
- The currently selected channel number and name.
- TX and RX frequencies.
- Real-time status indicators for Transmitting (TX) and Receiving (RX), which light up when the radio is active. 🎤
- A live RSSI meter to show you the signal strength of incoming transmissions.
- Live Status Widgets: At a glance, you can see:
- GPS Status: Whether the radio has a GPS lock and its current coordinates.
- Nearby Repeaters: This widget uses your GPS location (either from the radio or your device) to query the RepeaterBook API and show you the closest repeaters.
- APRS Info: See a count of nearby APRS stations.
- Scan Status: A simple indicator to show if memory scanning is active.
🗺️ APRS: See the Action on a Map
The APRS screen is one of the most exciting, fully-wired features!
- Real-time Packet Parsing: The app listens for APRS data packets coming from the radio’s TNC.
- Map Display: As packets are received, they are parsed, and the station’s location is plotted on an OpenStreetMap layer. 📍
- Station Info: Tapping on a station will show you its callsign and any comments.
- Path Visualization: There’s a cool (and working!) feature to draw lines showing the path a packet took through digipeaters to reach you.
📻 Channel Programming & Management
A huge part of using any radio is managing the channels. The Channels screen makes this a breeze.
- Read & Write: You can read all channels directly from the radio into a clean grid view. More importantly, you can edit every single parameter of a channel (frequencies, tones, power, name, etc.) and write it back to the radio.
- Memory Management:
- Save Backups: You can save your entire channel lineup as a named backup on your device.
- Load Memories: You can load any of your saved backups (or pre-configured memory lists included with the app) and write them to the radio. This is perfect for setting up a radio for a specific area or event in seconds!
- GPS Import: This is a big one! The app can use your location to find nearby repeaters from RepeaterBook and program them directly into your radio’s first 32 channels. 📡
🔍 Scanning: Find the Conversation
The Scan screen offers two powerful, fully functional scanning modes:
- Memory Scan: This screen displays all your memory channels. You can easily tap to add or remove channels from the scan list. A prominent “Start/Stop Scan” button controls the radio’s memory scanning feature directly.
- VFO Scan: For discovering new frequencies, you can switch to the VFO Scan Mode. Here you can:
- Set a start and end frequency.
- Choose a step size (e.g., 25 kHz).
- Hit “Start Scan,” and the app will command the radio to step through the frequency range, pausing when it detects a signal. The large display shows the currently scanning frequency in real-time.
⚙️ Settings & Control
The Settings pages allow you to control both the radio’s internal settings and the app’s behavior.
- Radio Settings: You can modify and save settings like squelch level, mic gain, power-saving options, and transmit timeouts directly to the radio.
- App Settings:
- Connect and disconnect from the radio via Bluetooth.
- Choose your GPS source (use the radio’s internal GPS or your phone/tablet’s GPS).
- Toggle between Light and Dark mode. 🌗
🚧 What’s Not Wired Up Yet?
Transparency is key! There are a couple of UI elements that are just placeholders for now:
- Vehicle Screen: You’ll see a cool “Vehicle” screen with gauges for RPM, speed, etc. This is currently just a mock-up and is not connected to any OBD-II data. This is a future goal for the project!
- Audio Monitoring: The
RadioControllerhas the logic to open an audio stream from the radio, but the actual SBC audio decoding has been temporarily disabled due to some dependency issues. So, while the button is there, you won’t hear any audio just yet.
That’s the tour! It’s been a blast building out the core functionality and seeing the radio respond to the app’s commands. Stay tuned for more updates! ✨

Leave a Reply